

Need to transfer emails to a new Gmail? Whether you’re switching to a fresh email address or consolidating accounts, the process can be surprisingly simple. Gmail provides two primary methods to migrate your emails, and your choice between them depends on the quantity of emails you want to move and your technical expertise. There is Gmail’s built-in import function, but it moves all emails at once. If you want more control over which emails to transfer to new a Gmail, the POP download method is ideal. This guide will walk you through enabling POP download in your old account, configuring your new account to bring those emails, and some options for what happens to the originals.
Using Gmail’s Import Tool to Transfer Emails to New Gmail
This is the simplest method and works well for most users. Gmail has a built-in import tool that allows you to directly transfer emails and contacts all at once from another Gmail account or even other email providers. However, you can’t choose specific emails to import. If you need more control over which emails are transferred, you’ll want to use the POP download method described later in this article.
- Sign in: Log in to the new Gmail account where you want to import your emails.
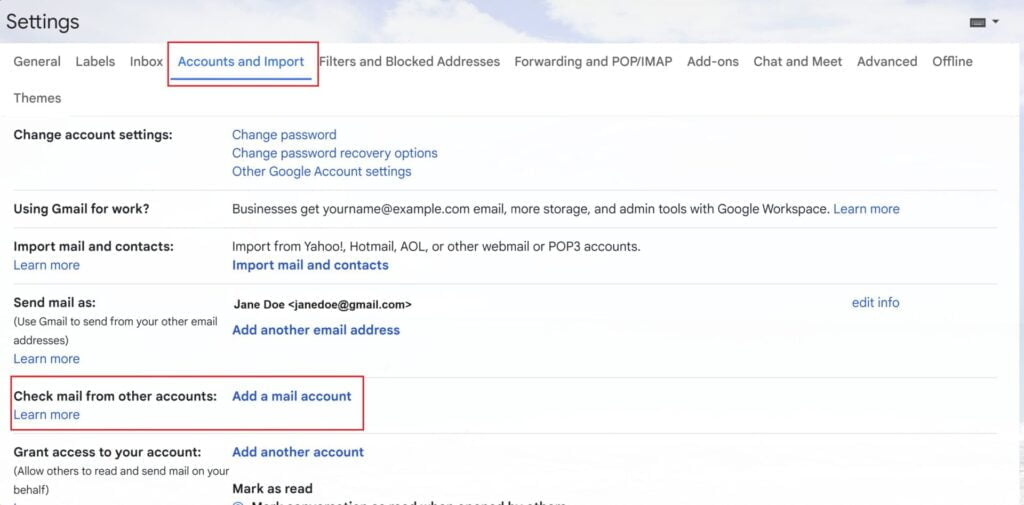
- Access Settings: Click the gear icon in the top right corner and select “Settings.”
- Accounts and Import: Navigate to the “Accounts and Import” tab.
- Add Mail Account: Under “Check mail from other accounts,” click “Add a mail account.”
- Enter Email Address: Enter the email address of the account you want to import emails from (this can be another Gmail account or an email address from a different provider).
- Follow Prompts: Follow the on-screen instructions, which will include entering your password for the other account and granting necessary permissions.
Tip: Before importing, consider creating a backup of your emails as a precautionary measure.
Transfer Emails to New Gmail Using POP Download (Step-by-Step Guide)
Let’s walk through how to transfer emails from one Gmail account to another using POP download. This method gives you more control over which emails you transfer.
Step 1: Enable POP Download in Your Old Account
- Sign in to your old Gmail account.
- Go to Settings (gear icon) > See all settings.
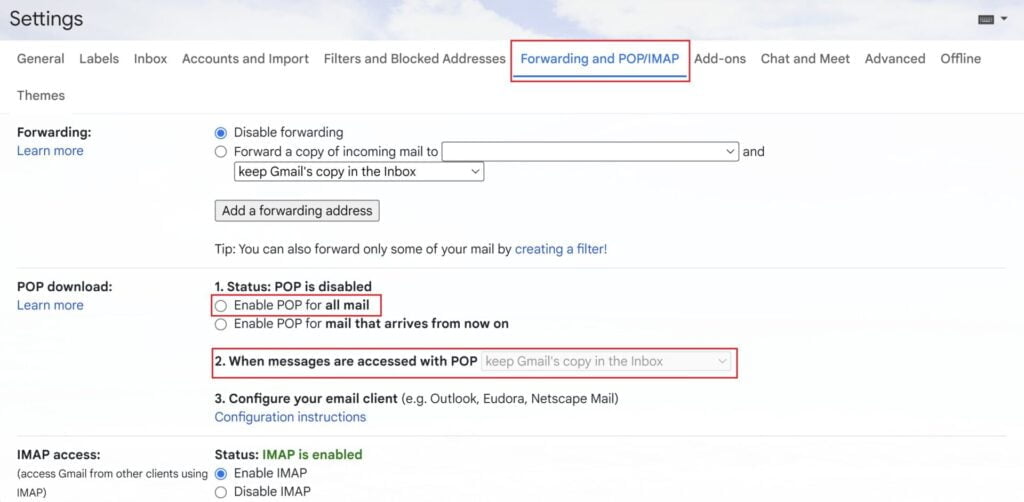
- Go to the “Forwarding and POP/IMAP” tab.
- In the “POP Download” section, select “Enable POP for all mail.”
- Choose what happens to messages after they’re accessed with POP:
- Keep Gmail’s copy in the Inbox: Leave a copy in your old account.
- Delete Gmail’s copy: Removes emails from your old account after download.
- Archive Gmail’s copy: Moves emails to the Archive folder in your old account.
- Click “Save Changes.”
Step 2: Configure Your New Account
- Sign in to your new Gmail account.
- Go to Settings (gear icon) > See all settings.
- Go to the “Accounts and Import” tab.
- Under “Check mail from other accounts,” click “Add a mail account.”
- Enter your old email address and click “Next.”
- Select “Import emails from my other account (POP3)” and click “Next.”
- Fill in the POP server details:
- POP Server: pop.gmail.com
- Port: 995
- Ensure “Always use a secure connection (SSL)” is checked.
- Enter your old account’s password.
- (Optional) You can choose to “Label incoming messages” to identify them in your new account.
- Click “Add Account.”
Step 3: Start the Transfer and Choose Email Fate (Optional)
- Gmail will automatically start downloading emails from your old account.
- By default, emails will remain in your old account after download. However, if you selected “Delete Gmail’s copy” in Step 1, they will be removed.
Things to Remember
- One-Time Transfer: POP download typically only transfers emails once. New emails won’t be automatically transferred.
- Forwarding: Consider setting up a filter in your old account to forward new emails to your new account for ongoing synchronization.
- Alternative: For continuous synchronization, IMAP is a better option.
Advanced Transfer Options (IMAP)
If you need your emails to be constantly synchronized between your old and new Gmail accounts, then you might want to consider using IMAP.
IMAP (Internet Message Access Protocol) is an email protocol that keeps your emails on the server, allowing you to access them from multiple devices and email clients. Any changes you make in one place (like reading an email or moving it to a folder) will be reflected across all your devices.
Transfer Emails to New Gmail with IMAP
Step 1: Configure IMAP in Your Old Gmail Account
- Log into your old Gmail account.
- Go to Settings (gear icon) > See all settings.
- Click on the “Forwarding and POP/IMAP” tab.
- In the “IMAP access” section, select “Enable IMAP.”
- Click “Save Changes.“
Step 2: Set Up Your New Gmail Account to Access Emails via IMAP
- Log into your new Gmail account.
- Go to Settings (gear icon) > See all settings.
- Click on the “Accounts and Import” tab.
- Under “Check mail from other accounts,” click “Add a mail account.“
- Enter your old Gmail address and click “Next.”
- Choose “Import emails from my other account (IMAP)” and click “Next.”
- Enter your old Gmail password and click “Add Account.”
Step 3: Initiate the Email Transfer
- Gmail will automatically start syncing your emails between the two accounts.
- The duration of the transfer depends on the volume of emails you have.
IMAP syncing can take time, especially with large volumes of emails. Be patient and let the process complete. IMAP syncs all changes, so deleting or moving emails in one account will affect the other.

Additional Tips for a Smooth Email Transfer
Before you transfer emails to your new Gmail account, consider these additional tips:
- Back-Up Your Data: As a precaution, it’s always wise to back up your emails before any major transfer. This ensures you have a copy in case of any unexpected issues.
- Clean Up Your Old Account: Delete unwanted emails and unsubscribe from unnecessary mailing lists. This will speed up the transfer process and make your new inbox less cluttered.
- Label Important Emails: If you want to easily locate specific emails after the transfer, label them in your old account so they’ll retain their labels in your new inbox.
- Verify your emails: After the transfer is complete, take some time to verify that all your emails have been successfully moved to your new account. Check different folders and labels to ensure everything is in order.
General Troubleshooting Tips
- Restart: Try restarting your email client or browser.
- Clear Cache and Cookies: Clearing your browser’s cache and cookies can sometimes resolve issues.
- Check Gmail Status: Visit the Gmail status dashboard to see if there are any known outages or issues.
- Gmail Help Resources: Consult Google’s official Gmail’s help resources for more detailed troubleshooting guides.
With the right tools and guidance, you can successfully transfer emails to a new Gmail account. Follow the steps outlined in this guide to seamlessly move your emails.
If you’re having trouble with Gmail, check out our guide to fixing common issues: Gmail Down? How to Fix Common Issues
FAQs
Can I transfer emails from a non-Gmail account?
Yes, Gmail’s import tool allows you to transfer emails from other email providers, such as Yahoo, Outlook, or AOL.
Will my old email address still work if I transfer emails to the new Gmail?
Yes, your old email address will still function as before. However, you may want to set up automatic forwarding to your new address so you don’t miss any important messages.
Can I transfer emails selectively?
Neither Gmail’s built-in import function nor POP download allows for selective email transfer directly. They both handle the process of transferring emails in a more wholesale manner. However, there are a couple of workarounds you can try if you need more control over which emails get transferred:
- Use Labels and Filters in your old account
- Label your emails: In your old account, you can organize your emails by labeling the ones you want to transfer.
- Set up a filter: Create a filter in your old account that automatically applies the label you created to any emails that meet certain criteria (e.g., from a specific sender containing a specific keyword).
- Use POP download (with Label option): When configuring POP download in your new Gmail account (as explained in the article), there’s an option to “Label incoming messages.” Choose the label you created for the emails you want to transfer. This will download only the emails with that specific label to your new account.
- Download emails and upload them selectively
- Download emails from your old account: You can utilize a third-party email client (like Thunderbird or Outlook) to download all your emails from your old account.
- Select and upload to Gmail: Within the email client, you can then select the specific emails you want to move and upload them to your new Gmail account. Most email clients allow exporting and importing emails in various formats.
Is Gmail’s email transfer process secure?
Yes, Gmail uses secure protocols to ensure safely transfer emails.